I’ll never forget the first time I tasted a slice of my grandma’s legendary Pink Velvet Cake. I was just a little girl, my pigtails bouncing as I raced into her kitchen, drawn by the most tantalizing aroma. As soon as that first forkful hit my tongue, I was transported to a world of pure, velvety bliss. The soft, moist crumb paired with the lush, creamy frosting – it was like nothing I’d ever experienced before.
From that day on, Pink Velvet Cake has held a special place in my heart. It’s the dessert I crave when I need a comforting taste of home, the showstopper I bake for every special occasion. And let me tell you, this recipe I’m about to share with you is truly something special.
Why This Pink Velvet Cake Recipe Will Become Your Go-To
The Secret Behind Perfect Pink Velvet Cake
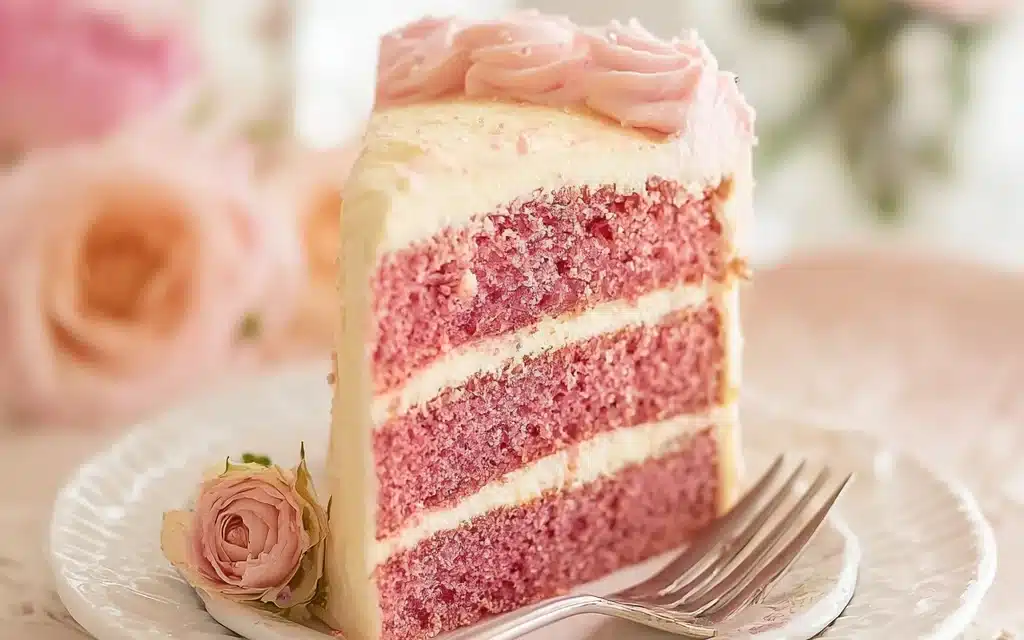
There’s a reason this Pink Velvet Cake recipe stands out from the rest – it’s all in the technique. Unlike traditional red velvet cakes, which rely on copious amounts of food coloring, this version gets its stunning hue from a carefully balanced blend of cocoa powder and just a touch of pink food coloring. The result is a cake that’s not only visually striking, but also wonderfully rich and chocolatey.
But the real magic happens in the mixing process. By alternating the addition of the dry ingredients and the buttermilk, we create a batter that’s silky-smooth and perfectly aerated. This ensures your Pink Velvet Cake will rise tall and proud, with a tender crumb that simply melts in your mouth.
Essential Ingredients You’ll Need
To achieve that signature Pink Velvet Cake perfection, you’ll need a carefully curated lineup of ingredients:
- 2 cups all-purpose flour: The foundation of the cake, providing structure and stability.
- 1 1/2 cups granulated sugar: Sweetens the cake and balances the rich cocoa powder.
- 1/2 cup unsweetened cocoa powder: Lends that deep, chocolatey flavor we all love.
- 1 teaspoon baking soda: Helps the cake rise and achieve that light, fluffy texture.
- 1/2 teaspoon salt: Enhances the other flavors and prevents the cake from tasting flat.
- 1 cup buttermilk: Adds moisture and a delightful tang that complements the chocolate.
- 1/2 cup unsalted butter, softened: Contributes richness and a velvety mouthfeel.
- 2 large eggs: Binds the batter and gives the cake structure.
- 1 teaspoon vanilla extract: Heightens the overall flavor profile.
- 1-2 tablespoons pink food coloring: Transforms the cake into a stunning, vibrant hue.
Step-by-Step Pink Velvet Cake Instructions
Preparing Your Pink Velvet Cake
Ready to get baking? This Pink Velvet Cake comes together in a snap, with just 15 minutes of prep time and a 30-minute bake. You’ll need a few key tools – a stand mixer or hand mixer, a couple of mixing bowls, and a 9×13-inch baking pan. Once you’ve gathered your ingredients and equipment, it’s time to start mixing!
1- Preheat your oven to 350°F and grease your baking pan with butter or non-stick spray. In a large bowl, whisk together the flour, sugar, cocoa powder, baking soda, and salt until well combined.
2- In a separate bowl, beat the softened butter until light and fluffy, about 2-3 minutes. Then, add the eggs one at a time, beating well after each addition. Stir in the vanilla extract and the food coloring, starting with 1 tablespoon and adding more as needed to achieve your desired shade of pink.
3- Now, it’s time to incorporate the dry and wet ingredients. Add a third of the dry mixture to the butter-egg mixture, and beat on low speed until just combined. Then, add half the buttermilk and beat again until smooth. Repeat this process, alternating between the dry ingredients and buttermilk, until everything is well incorporated.
4- The batter should be thick, velvety, and a vibrant shade of pink. Pour it into your prepared baking pan, smoothing the top with a spatula.
5- Bake the cake for 30 minutes, or until a toothpick inserted into the center comes out clean. Allow the cake to cool completely in the pan before frosting and serving.
6- Once cooled, frost the cake with your favorite buttercream or cream cheese frosting. Slice and serve, marveling at the stunning pink hue and delectable texture of your homemade Pink Velvet Cake.
Pro Tips for Success
- Make sure all your ingredients are at room temperature before beginning – this helps them blend together seamlessly.
- Don’t overmix the batter once the dry ingredients and buttermilk have been added. Overmixing can lead to a tough, dense texture.
- Start with 1 tablespoon of food coloring and add more as needed to achieve your desired shade of pink. Different brands may have varying levels of pigmentation.
- Use a gentle hand when folding in the food coloring to avoid deflating the airy batter.
- Be patient and let the cake cool completely before frosting – this prevents the frosting from melting or becoming runny.
Serving and Storing Your Pink Velvet Cake
Perfect Pairings for Pink Velvet Cake
This decadent Pink Velvet Cake is the ultimate crowd-pleaser, serving up to 12 lucky people. It’s the perfect centerpiece for any special occasion, from birthdays and anniversaries to holiday gatherings and bridal showers.
For the ultimate indulgence, I recommend pairing a slice of this cake with a scoop of creamy vanilla ice cream or a dollop of freshly whipped cream. The cool, creamy contrast is simply divine. And don’t forget the coffee – a steaming cup of rich, bold brew is the perfect complement to the cake’s chocolatey richness.
Storage and Make-Ahead Tips
One of the best things about this Pink Velvet Cake recipe is that it stores beautifully. Once the cake has cooled completely and been frosted, you can keep it covered at room temperature for up to 3 days. For longer storage, simply transfer the cake to the refrigerator, where it will stay fresh for up to 1 week.
If you’re looking to get a head start on your baking, you can actually make the cake layers in advance and freeze them. Just wrap the unfrosted layers tightly in plastic wrap and store them in the freezer for up to 3 months. When you’re ready to serve, simply thaw the layers at room temperature, frost, and enjoy.
Variations and Dietary Adaptations for Pink Velvet Cake
Creative Pink Velvet Cake Variations
While this classic Pink Velvet Cake is a showstopper on its own, there are plenty of ways to put your own spin on it. Try swirling in a layer of creamy cheesecake filling for an extra-indulgent twist. Or, for a festive flair, top the frosted cake with crushed peppermint or a dusting of edible glitter.
You can also experiment with different flavor profiles – a hint of orange zest or a splash of coffee extract can take this cake in a delightfully sophisticated direction. And let’s not forget the endless possibilities when it comes to frosting – from tangy cream cheese to silky Italian meringue, the options are truly endless.
Making Pink Velvet Cake Diet-Friendly
If you’re looking to enjoy this Pink Velvet Cake while sticking to a special diet, don’t worry – there are plenty of ways to adapt the recipe. For a gluten-free version, simply swap out the all-purpose flour for a high-quality gluten-free blend. And for a vegan take, use plant-based milk in place of the buttermilk, and substitute the eggs with flax or chia “eggs.”
Those watching their carb intake can try a low-carb spin by swapping the granulated sugar for a keto-friendly sweetener like erythritol or monk fruit. Just be sure to adjust the ratios and baking times accordingly. No matter your dietary needs, this Pink Velvet Cake can be tailored to suit your taste buds.
Frequently Asked Questions
Q: Can I substitute regular milk for the buttermilk?
A: While you can use regular milk in a pinch, the buttermilk is essential for achieving the signature tang and moist texture of this Pink Velvet Cake. For best results, I recommend using the full-fat buttermilk as specified in the recipe.
Q: How do I know when the cake is fully baked?
A: The cake is done when a toothpick inserted into the center comes out clean, with no wet batter clinging to it. The top should also be set and slightly springy to the touch. Be sure to set a timer and check the cake at the 30-minute mark, as oven temperatures can vary.
Q: Can I make this cake ahead of time?
A: Absolutely! This Pink Velvet Cake actually gets better with time. You can bake the cake layers up to 3 months in advance and store them in the freezer. When you’re ready to serve, simply thaw the layers at room temperature, frost, and enjoy.
Q: How many people will this cake serve?
A: This recipe is designed to serve 12 generous slices. However, you can easily scale the ingredients up or down to accommodate a smaller or larger crowd, depending on your needs.
Q: Why is my cake dry or crumbly?
A: If your Pink Velvet Cake turns out dry or crumbly, it’s likely due to overbaking or overmixing the batter. Be sure to set your timer and check the cake a few minutes before the recommended baking time. And when incorporating the dry and wet ingredients, mix just until they’re combined, avoiding any unnecessary agitation.

Delicious Pink Velvet Cake
- Total Time: 45
- Yield: 12 servings
Description
Indulge in the perfect Pink Velvet Cake – a moist, velvety cake with a delightful pink hue and a rich, creamy flavor. This easy-to-make recipe is sure to impress your guests and satisfy your sweet tooth.
Ingredients
– 2 cups all-purpose flour
– 1 1/2 cups granulated sugar
– 1/2 cup unsweetened cocoa powder
– 1 teaspoon baking soda
– 1/2 teaspoon salt
– 1 cup buttermilk
– 1/2 cup unsalted butter, softened
– 2 large eggs
– 1 teaspoon vanilla extract
– 1-2 tablespoons pink food coloring
Instructions
1. Preheat your oven to 350°F (175°C). Grease and flour two 9-inch round cake pans.
2. In a medium bowl, whisk together the flour, sugar, cocoa powder, baking soda, and salt.
3. In a separate bowl, beat the buttermilk, butter, eggs, and vanilla until well combined.
4. Gradually add the wet ingredients to the dry ingredients, mixing until just combined. Stir in the food coloring, starting with 1 tablespoon and adding more as desired to achieve the perfect pink hue.
5. Divide the batter evenly between the prepared cake pans.
6. Bake for 25-30 minutes, or until a toothpick inserted in the center comes out clean.
7. Allow the cakes to cool in the pans for 10 minutes, then transfer them to a wire rack to cool completely.
8. Once cooled, frost the cakes with your favorite cream cheese or buttercream frosting and enjoy!
Notes
For an extra moist and tender cake, consider substituting the buttermilk with sour cream. You can also add a teaspoon of instant coffee powder to the batter to enhance the chocolate flavor.
- Prep Time: 15
- Cook Time: 30
- Category: Dessert
- Method: Baking
- Cuisine: American
Conclusion
This Pink Velvet Cake recipe is truly a labor of love, but I promise the end result is worth every minute. With its stunning hue, velvety texture, and rich, chocolatey flavor, it’s a dessert that’s sure to wow your family and friends.
Whether you’re baking it for a special occasion or just treating yourself, this Pink Velvet Cake is guaranteed to become a new favorite. So preheat your oven, gather your ingredients, and get ready to create a dessert that’s as beautiful as it is delicious. I can’t wait to hear how your Pink Velvet Cake turns out – be sure to share your creations with me in the comments below!

