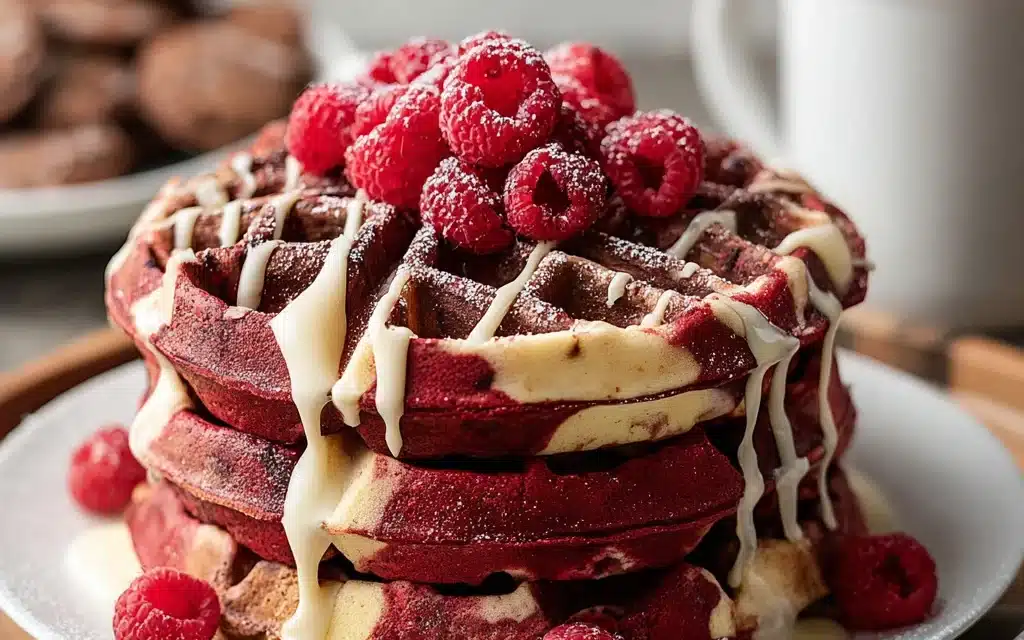
I can still remember the first time I made these tantalizing Red Velvet Marble Waffles. It was a lazy Sunday morning, and I was craving something indulgent yet comforting. As I mixed the batter and watched the vibrant red and dark chocolate swirls come together, I knew I had stumbled upon something truly special. The aroma of freshly baked waffles, laced with the rich, cocoa-y notes of red velvet, filled my kitchen, making my mouth water in anticipation.
Once the waffles were ready, I couldn’t wait to dive in. The crisp, golden exterior gave way to a soft, fluffy interior, with those irresistible pockets of red velvet goodness. I topped them with a generous dollop of homemade whipped cream and a drizzle of warm maple syrup, and it was like taking a bite of pure indulgence. From that moment on, this recipe has become a staple in my household, a go-to breakfast that never fails to impress.
Why This Red Velvet Marble Waffles Recipe Will Become Your Go-To
The Secret Behind Perfect Red Velvet Marble Waffles
What sets this Red Velvet Marble Waffles recipe apart is the perfect balance of flavors and textures. The combination of all-purpose flour, granulated sugar, unsweetened cocoa powder, baking powder, baking soda, and salt creates a sturdy yet light waffle base that can hold up to the rich, indulgent red velvet swirls. The buttermilk lends a subtle tanginess that complements the sweetness, while the melted butter and vanilla extract add depth and richness to the overall flavor profile.
The real magic, however, lies in the way the red food coloring is incorporated. By gently folding it into the batter, you create those stunning, marbled patterns that make these waffles truly unique. It’s a simple technique that yields stunning results, transforming an ordinary waffle into a work of art.
Essential Ingredients You’ll Need
- 2 cups all-purpose flour: This provides the structure and base for the waffles, ensuring a perfectly fluffy and tender texture.
- 2 tablespoons granulated sugar: The sugar adds a subtle sweetness that balances the richness of the red velvet.
- 2 tablespoons unsweetened cocoa powder: This ingredient is crucial for that authentic red velvet flavor, lending a deep, chocolatey note to the waffles.
- 1 teaspoon baking powder: The baking powder helps the waffles rise and achieve that light, airy texture.
- 1/2 teaspoon baking soda: Baking soda contributes to the leavening, creating a tender, fluffy interior.
- 1/4 teaspoon salt: A pinch of salt enhances the overall flavor, preventing the waffles from tasting flat.
- 1 1/2 cups buttermilk: The buttermilk adds tanginess and moisture, resulting in a tender, moist waffle.
- 2 large eggs: The eggs provide structure and richness, helping to bind the ingredients together.
- 1/4 cup unsalted butter, melted: The melted butter adds a decadent, buttery flavor and creates a crisp exterior.
- 1 teaspoon vanilla extract: Vanilla extract enhances the overall flavor profile, complementing the red velvet notes.
- 2 tablespoons red food coloring: This is the key ingredient that gives the waffles their distinctive red velvet appearance and flavor.
Step-by-Step Red Velvet Marble Waffles Instructions
Preparing Your Red Velvet Marble Waffles
With a prep time of just 15 minutes and a cook time of 15 minutes, this Red Velvet Marble Waffles recipe is a quick and easy way to treat your family to a delicious, homemade breakfast. You’ll need a waffle iron, a large mixing bowl, a whisk, and a spatula to get started.
1- Begin by preheating your waffle iron to the desired temperature. In a large mixing bowl, whisk together the 2 cups of all-purpose flour, 2 tablespoons of granulated sugar, 2 tablespoons of unsweetened cocoa powder, 1 teaspoon of baking powder, 1/2 teaspoon of baking soda, and 1/4 teaspoon of salt until well combined.
2- In a separate bowl, whisk together the 1 1/2 cups of buttermilk, 2 large eggs, 1/4 cup of melted unsalted butter, and 1 teaspoon of vanilla extract until the mixture is smooth and fully incorporated.
3- Gently fold the wet ingredients into the dry ingredients, being careful not to overmix. Once the batter is just combined, add the 2 tablespoons of red food coloring and use a spatula to gently swirl it through the batter, creating a marbled effect.
4- Scoop the batter onto the preheated waffle iron, using about 1/2 cup of batter per waffle. Cook the waffles for 3-4 minutes, or until they are golden brown and crispy on the outside.
5- Carefully remove the waffles from the iron and place them on a wire rack or a plate lined with a paper towel to keep them warm and crisp.
6- Serve the Red Velvet Marble Waffles warm, topped with a generous dollop of whipped cream, a drizzle of maple syrup, and a dusting of powdered sugar, if desired. Enjoy this decadent breakfast treat with your loved ones.
Pro Tips for Success
- Be gentle when folding in the red food coloring to avoid overmixing the batter, which can result in tough, rubbery waffles.
- Make sure your waffle iron is properly preheated before adding the batter to ensure even cooking and crisp edges.
- Use room temperature ingredients, as they will incorporate more easily and result in a lighter, fluffier waffle.
- Don’t be afraid to experiment with toppings and sauces – these Red Velvet Marble Waffles pair beautifully with a variety of sweet and savory accompaniments.
- For best results, use a high-quality unsweetened cocoa powder to achieve that deep, rich red velvet flavor.
Serving and Storing Your Red Velvet Marble Waffles
Perfect Pairings for Red Velvet Marble Waffles
These decadent Red Velvet Marble Waffles, which serve 6 people, are the perfect breakfast or brunch treat. They pair beautifully with a variety of toppings and accompaniments. For a classic pairing, top the waffles with a generous dollop of freshly whipped cream and a drizzle of warm maple syrup. For a more indulgent twist, try a scoop of creamy vanilla ice cream or a dollop of tangy cream cheese frosting.
If you’re looking for a savory twist, these waffles also make a delicious base for an open-faced breakfast sandwich, with crispy bacon, a fried egg, and a sprinkle of shredded cheddar cheese. Serve the Red Velvet Marble Waffles alongside a fresh fruit salad or a steaming mug of hot coffee or cocoa for a truly satisfying meal.
Storage and Make-Ahead Tips
These Red Velvet Marble Waffles can be stored in the refrigerator for up to 3 days or in the freezer for up to 2 months. To reheat refrigerated waffles, simply place them in a toaster or oven preheated to 350°F for a few minutes, or until heated through and crispy.
For freezer storage, let the waffles cool completely, then stack them with parchment paper in between each one to prevent sticking. Place the stacked waffles in a resealable freezer bag or airtight container. When ready to enjoy, simply remove the desired number of waffles, reheat in the toaster or oven until hot and crisp.
You can also prepare the batter ahead of time and store it in the refrigerator for up to 2 days. When ready to cook, simply give the batter a quick stir, add the red food coloring, and scoop it onto the preheated waffle iron.
Variations and Dietary Adaptations for Red Velvet Marble Waffles
Creative Red Velvet Marble Waffles Variations
For a seasonal twist, try adding a teaspoon of ground cinnamon or a pinch of nutmeg to the batter. You can also fold in chopped pecans or walnuts for a delightful crunch.
Swap out the vanilla extract for a teaspoon of almond extract for a lovely, nutty flavor profile. For a truly decadent experience, swirl in a tablespoon of cream cheese or mascarpone into the batter before cooking.
If you’re feeling adventurous, try incorporating a handful of mini chocolate chips or chopped white chocolate into the batter for an extra indulgent treat.
Making Red Velvet Marble Waffles Diet-Friendly
To make these Red Velvet Marble Waffles gluten-free, simply substitute the all-purpose flour with a 1-to-1 gluten-free flour blend. You may need to adjust the amount of liquid in the batter to achieve the desired consistency.
For a vegan version, replace the eggs with 1/4 cup of unsweetened applesauce or mashed banana, and use plant-based milk, such as almond or oat milk, instead of buttermilk. Swap the melted butter for an equal amount of melted coconut oil or vegan butter.
If you’re watching your carb intake, you can try using a combination of almond flour and coconut flour in place of the all-purpose flour. Adjust the sweetener to your liking, using a calorie-free alternative like erythritol or stevia.
Frequently Asked Questions
Q: Can I use a different type of flour besides all-purpose?
A: While all-purpose flour works best for this recipe, you can try substituting with a 1-to-1 gluten-free flour blend for a gluten-free version of the Red Velvet Marble Waffles.
Q: How do I ensure the waffles cook evenly and don’t come out soggy?
A: Make sure your waffle iron is properly preheated before adding the batter, and avoid overmixing the ingredients, as this can lead to a dense, rubbery texture. Additionally, be sure to cook the waffles for the full 3-4 minutes to achieve a crisp exterior.
Q: Can I make the batter ahead of time?
A: Yes, you can prepare the batter up to 2 days in advance and store it in the refrigerator. Just be sure to give it a quick stir before adding the red food coloring and cooking the waffles.
Q: How many servings does this recipe make?
A: This Red Velvet Marble Waffles recipe yields 6 servings, with each serving being one waffle.
Q: What should I do if the waffles stick to the iron?
A: Make sure to grease the waffle iron thoroughly before adding the batter, and avoid opening the lid too frequently during cooking, as this can cause the waffles to stick. If you still have trouble, try spraying the iron with a non-stick cooking spray between batches.

Red Velvet Marble Waffles
- Total Time: 30
- Yield: 6 servings
Description
Indulge in the ultimate breakfast treat with these rich and decadent Red Velvet Marble Waffles. The swirling pattern of red velvet and vanilla batter creates a visually stunning and delicious waffle that’s sure to impress.
Ingredients
– 2 cups all-purpose flour
– 2 tablespoons granulated sugar
– 2 tablespoons unsweetened cocoa powder
– 1 teaspoon baking powder
– 1/2 teaspoon baking soda
– 1/4 teaspoon salt
– 1 1/2 cups buttermilk
– 2 large eggs
– 1/4 cup unsalted butter, melted
– 1 teaspoon vanilla extract
– 2 tablespoons red food coloring
Instructions
1. Preheat your waffle iron according to the manufacturer’s instructions.
2. In a large bowl, whisk together the flour, sugar, cocoa powder, baking powder, baking soda, and salt.
3. In a separate bowl, combine the buttermilk, eggs, melted butter, and vanilla extract.
4. Pour the buttermilk mixture into the dry ingredients and stir just until combined (do not overmix).
5. Divide the batter in half and mix the red food coloring into one half.
6. Spoon alternating spoonfuls of the red velvet and plain batters onto the preheated waffle iron.
7. Cook the waffles until golden brown and cooked through, about 4-5 minutes.
8. Serve the Red Velvet Marble Waffles warm, with your favorite toppings like whipped cream, fresh berries, and maple syrup.
Notes
For a more pronounced marble effect, you can swirl the batter with a knife or spoon before cooking. Store any leftover waffles in an airtight container in the freezer for up to 3 months.
- Prep Time: 15
- Cook Time: 15
- Category: Desserts
- Method: Baking
- Cuisine: American
Conclusion
These Red Velvet Marble Waffles are a true breakfast (or brunch) masterpiece. With their striking visual appeal, decadent flavors, and irresistible texture, they’re sure to become a new family favorite. Whether you’re serving them up for a cozy weekend morning or impressing guests at a special occasion, this recipe is a surefire way to bring a touch of indulgence to your day. So why not give it a try and experience the magic of these stunning, Red Velvet Marble Waffles for yourself? Don’t forget to share your creations and let me know what you think in the comments below!


